Showing posts with label garlic press. Show all posts

Tuesday, April 22, 2014

White Lightning Chicken Chili ( white bean ) and Artisan Bread

Ok...I have been so busy making Macaroons (recipe to come) and prepping for events I am cooking for that I have run sorely behind.

I apologize but promise the newest recipes are winners!

White Lightning Chicken Chili


Recently a friend made white bean chicken chili for a potluck and I was inspired to try making my own.  Luckily The Pampered Chef had a great recipe to start with.   I prepared the chili in the morning and placed in a slow cooker for the day to serve for supper.  If you are making to eat right away, the RockCrok Dutch Oven would be an excellent choice :)

I started by making my chicken in the Deep Covered Baker .... As I have said, this is my "go to" way of preparing chicken now.  A little olive oil in the bottom, 2 chicken breasts brushed with a little more oil, cover and cook 5 minutes on each side! 


Once the chicken was done, I chopped in my electric food processor quick. 
 I wanted nice hearty chunks of chicken.

Next I sliced 1 jalapeno and 1 onion and placed in a saute pan to cook.


While my vegetables were cooking, I drained 1 can of Great Northern beans and placed in a bowl.  I opened and drained 2 more cans of great northern beans and placed in a bowl to the side.

To my bowl with 1 can of beans, I used my Garlic Press to place 6 cloves of garlic in the bowl.  I then mashed the beans and garlic together.


At this point I added the chicken broth, vegetables and mashed beans to my slow cooker with the chicken and mixed well. I added 1/2 a package of taco seasoning and the juice of one lime and mixed together again.

  I allowed it to cook on high for 2 hours and then low for 4 hours. 
 I stirred it all occasionally and checked flavor.

About an hour before serving I mixed a little cornstarch and water together and added to the soup to thicken.


Now during the hours that my soup was in the slow cooker, I was also making my first loaf of no knead artisan bread :)


I started by placing 3 cups of whole wheat bread flour, my yeast, and salt in a mixing bowl.  I also added some Parmesan Garlic Dipping Seasoning to the mixture for some added pizazz!  I mixed together and then added my 1 1/2 cups water and 3 Tbsp. oil.  The dough is slightly sticky.


I lightly oiled the bottom of my clean (it had previously made chicken) Deep Dish Baker.  I placed my ball of dough directly in the Deep Dish Baker and covered in Plastic Wrap.  I allowed it to rise about 4 hours.


I sprinkled a little flour over the top and cut decorative lines into the top of the bread.   Bake at 450 degrees covered for 30 minutes and then uncovered for another 10-15 minutes.


The finished products, chili topped with shredded cheese and a splash of salsa.

This was not my husbands favorite meal, but I thought it was pretty tasty and hearty.  I had friends who gladly took all the leftovers off our hands :)

I don't feel my bread was the best and next time will plan ahead so I have more "rising" time before baking, but for my first ever attempt at making bread, it was pretty delicious...just needs to be prettied up a bit!


Friday, April 11, 2014

Turkey & Black Bean Taco Stuffed Bell Peppers

Hot diggity!  I am really enjoying trying new and healthy recipes.  I found this one on Pinterest, but I will be using it again and again with variations through out the summer.

http://www.pinterest.com/pin/212232201164142853/

Leads to this website:  http://clefoodgoddess.com/texmex-stuffed-peppers/

Now for what I did.

Preheat your oven for 375 degrees.

I cooked up my ground turkey with some garlic.  Once browned I added my reduced sodium taco seasoning. ( I am going to try to make my own taco seasoning this summer)  Then 1 can of drained black beans.


I washed my peppers, cut the tops off and scraped the seeds out of them.  I then filled the peppers with my taco mixture.  I used my Pampered Chef Muffin Tin for baking as this allowed my peppers to stand up nicely.  I sprinkled with some shredded cheese and baked for 20 minutes.


The recipe took less than 30 mintues in total and 2 stuffed peppers is under 500 calories :)

Short, Sweet, Simple and to the point!  Enjoy the great spring weather we are finally having.  We will see what I cook up next week :)

Wednesday, April 9, 2014

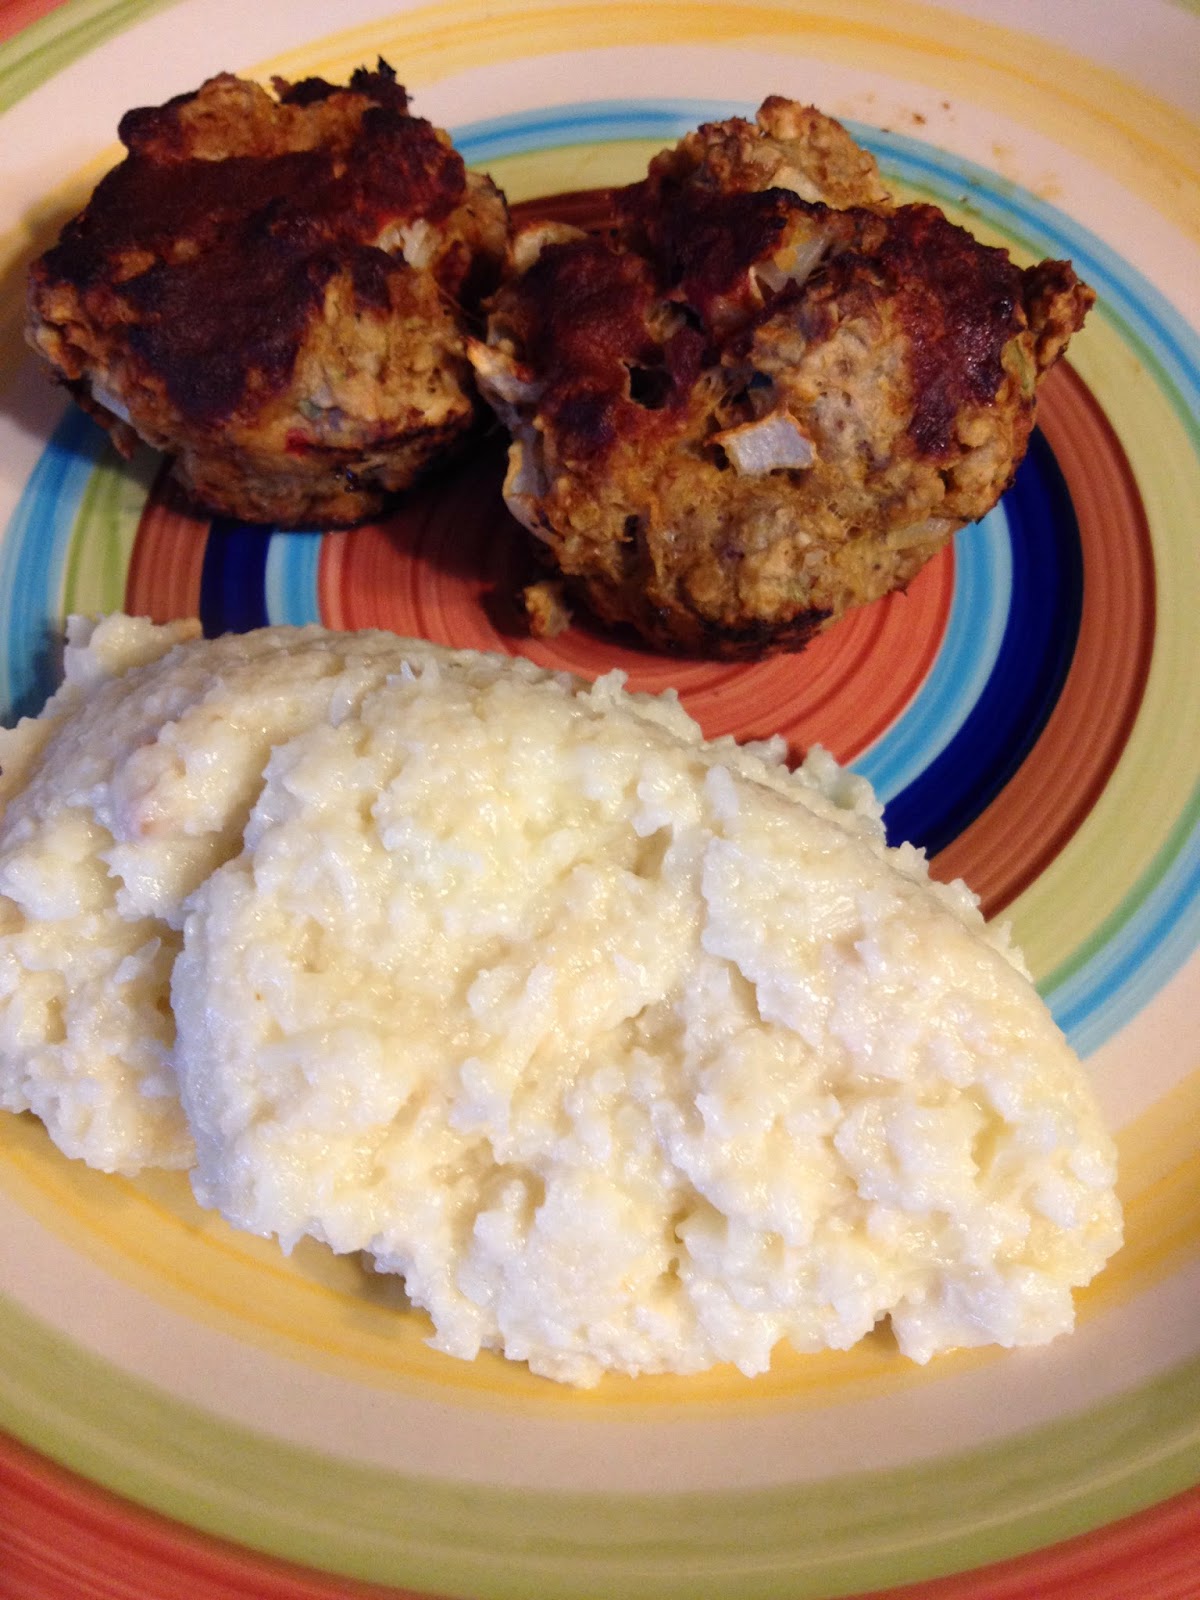
Mini Veggie/Turkey Meatloaf Cupcakes and Cauliflower Mash

This recipe isn't a recipe....it is a hodge podge of what I wanted to make combined with my leftovers from a potluck.  For the potluck I had made the Cucumber Lime Dip and some Fresh Salsa. 

For supper I wanted to make cute little mini meatloaf, so this is what I did.

In a mixing bowl I combined:

1 lb. ground turkey
1 1/2 cups Oats
1/3 cup fresh salsa
1/3 cup Cucumber lime dip
1 chopped onion

I then rolled into balls and filled my Muffin Tin

I baked at 350 degrees for 30-35 minutes.  I topped with a special secret recipe sauce, but you are welcome to top as desired.


For the Cauliflower Mash, I started with one head of cauliflower.  I washed it and cut into florets.  I then placed in a pot of water and boiled for about 15 minutes and drained. I wish I had the Large Micro Cooker, as this would have completely simplified the process.


After draining the cauliflower, I mashed with the Mix N' Masher.    I added just a dash of milk and some chipotle seasoning and 1 clove of garlic to taste.

This meal was under 500 calories. It is ~Happy Husband and Ginger Princess Approved~ though my husband still says he prefers mashed potatoes and gravy :)  At least he is honest and open minded enough to keep trying all my recipes!


Saturday, April 5, 2014

For the love of peas - Mock Guacamole

As I continue on my path of eating healthier foods, I am really looking for unique veggie recipes that call to me.  I love peas!  Well I really enjoy most green veggies, but peas are one of my favorites.  In the summer months I make a lot of fresh salsa and guacamole so this recipe seemed interesting to me.

Mock Guacamole

Please read the recipe, but I am going to tell you how I made it.

ALL IN THE MANUAL FOOD PROCESSOR!

I cut my tomato, onion, and cilantro and placed in the manual food processor with my peas.  I then added garlic with my garlic press.  A squeeze of lime and some salt and pepper.....and mix!


So simple and I thought it was delicious....my husband did not think it was close enough to the real deal.

I added this and some baked corn chips to my dinner of bell pepper chicken breast and alfalfa sprouts...so yummy and healthy!

Monday, March 24, 2014

Steak & Guinness Pie


I received this cookbook from my best friend on my 1st wedding anniversary.  He had moved to the NYC area and fallen in love with Tea & Sympathy.  It is a quaint little shop, 1 half sweets shop and cup'a tea to go and the other half exquisite eatery and tea service.  This past December, upon visiting him we made a few stops to this fine establishment, I fell in love too!  The tea, the desserts, the Steak & Guinness Pie :)  We had the privilege of speaking with the Grand Madam, Nicola, herself and she assured me that if I followed her recipe I would have superb Steak & Guinness Pie at home......I was terribly excited to try, but knew I wanted to wait until St. Patrick's Day.

Enjoying some Rose Tea while awaiting my Steak & Guinness Pie - Tea & Sympathy December 2013


 After my success with my RockCrok Dutch Oven when preparing French Onion & Mushroom soup a few weeks ago, I decided to test the great versatility of the pot again with this recipe.


 First I cubed my steak, I can't recall the cut of the meat as my husband is the one who purchased it.  You don't want anything too thick and want to cut into small cubes.  Adding 1/4 c. butter and a splash of olive oil to my dutch oven on Med-High heat, I seared the meat until brown and mostly done.

As the meat cooked, I cut my onions.  I usually do all my onions by hand, but decided to try my Simple Slicer.  I will rarely cut onions by hand again.  This little device was amazing to use and easy to clean ( I have been using it non-stop now for a week )

When the meat is done, scoop into a dish a set aside.  Now place your onions and garlic into the meat juices and continue to cook.  I don't like my onions mushy soft, so when they were brown and to the consistency I appreciate, the meat was replaced to the dutch oven. 
Meat, onion and garlic

To the meat, onion and garlic combination, I added flour, paprika, brown sugar and tomato puree.  Cook for about 5 minutes to make sure all ingredients are combined. 
Flour, brown sugar and paprika


 Now add 2 1/2 c.  Beef stock and 2 1/2 c. Guinness  - for the Guinness this is roughly 2 bottles.  
Stock and Guinness added
I added my herbs and bay leaves, turned to a Med-Low to simmer, stirring occasionally.  
I took a quick taste test.  I prefer savory tastes, so did go outside the recipe and added 1 1/2 tsp. of cayenne pepper to help eliminate the brown sugar sweetness.


Next for the Pastry:
I am not a pastry making person and knew this could be the challenge for me.

Sift your flour and salt into a bowl and "rub" butter and shortening in until your mixture has the consistency of crumbs. Create a well, add your cold water and mix until a dough forms.  Roll quickly into a ball with your hands and place in cellophane and in the fridge for 30 minutes.


After 30 minutes, I rolled my dough out on the counter with a well floured counter top and rolling pin.

I used the dutch oven lid and a faux cookie cutter for the pie.  This is where I learned that the RockCrok Everyday Pan or the Deep Dish Pie Plate may be better options.  I had troubles creating a seal of the crust around the outside of the dutch oven. 
 Make sure to brush a little egg on your pastry and then bake for about 1 hour.

I dyed left over dough and hand cut shamrocks for a lil flare.


Regardless of the small pastry struggle, this recipe was amazing!  My husband and I were both pleased with the results and he was happy for my addition of cayenne pepper to offset the sweet.


Tuesday, March 11, 2014

Fabulous French Onion & Mushroom Soup


**French Onion & Mushroom Soup **

-6 Tbsp Butter (3/4 stick), divided
-6 oz French bread, sliced into 16 (1/2") slices
-8 oz cremini mushrooms, quartered
-5 large sweet onions
-3 garlic cloves, pressed
-1 Tbsp sugar
-1 Cup dry red wine (such as Cabernet Sauvignon)
-3 Tbsp flour
-8 Cups unsalted beef stock
-2 tsp salt
-1 tsp ground black pepper
-3 sprigs fresh thyme, plus 1 Tbsp leaves
-6 Oz Gruyere cheese, shredded (1-1/2 Cups)

Directions
1. Melt 1 Tbsp of the butter in Dutch Oven over medium heat. Toast bread 1-2 minutes per side or until light golden brown; remove bread; set aside.

2. Add 1 Tbsp of the butter and mushrooms to the Dutch Oven; cook, uncovered 8-9 minutes, or until mushrooms are deep golden brown, stirring occasionally. Remove mushrooms.

3. Meanwhile, slice onions with Simple Slicer on #2 setting. Add remaining 4 Tbsp butter, onions, garlic and sugar to Dutch Oven, cook, uncovered 25-30 minutes or until onions are dark brown, stirring occasionally.

4. Add wine; cook, uncovered, 5-7 minutes or until liquid is no longer visible, but onions are still moist. Stir in flour, cook 1 minute. Stir in stock, salt, pepper, and mushrooms. Insert thyme springs into Herb Infuser, add to soup. Increase heat to medium-high. Cook, covered, 8-10 minutes or until soup comes to a gentle boil. Remove from heat and remove Herb Infuser.

5. Preheat broiler. Arrange toasted bread over soup; sprinkle evenly with cheese. Place Dutch Oven 2-4 inches from the heating element; broil 2-4 minutes or until cheese is bubbling. Remove from oven; sprinkle with thyme leaves.


~This recipe comes with the RockCrok, which is why there is not a recipe link.  If you would like the traditional Pampered Chef French Onion soup, the recipe is  HERE - (French Onion Soup). ~
Yes, that is a BACON hand towel on my oven door :)

I will say that this recipe took me almost 90 minutes from start to finish, but it was truly an act of love.  I enjoyed every moment of preparing and eating this dish!  To start, I opened my bottle of Cabernet Sauvignon, poured myself half a glass and let the bottle continue to breath as I prepared my vegetables.  I also made myself a little snack, using balsamic vinegar, olive oil and Pampered Chef garlic/Parmesan seasoning and the end of the loaf of bread :)


Treat yourself like a Pampered Chef and enjoy the experience!


Melt your tablespoon of butter on medium heat in your pan and toast your slices of bread (2 mins on each side)  Covering the bottom of the pan to toast your bread will make sure you aren't wasting bread that won't fit on top in the end.  When toasted, set aside on a plate.


Add another tablespoon of butter and your mushrooms to the pan. 
Cook uncovered for about 8 mins. until golden brown.


Slice your onions and garlic as your mushrooms are cooking down, stir them occasionally.
When mushrooms are done, remove them and place in a bowl to the side.
 Add the rest of your butter, garlic, onions and sugar to the pan.
Cook for 30 minutes or until the onions are dark brown or cooked to your liking. 
I prefer my onions to still have a fleshy texture.

Start

Finish


 Add wine and cook down, add flour and cook for 1 minute,
 then add your stock (veggie if you prefer) and mushrooms.

Wine added


Stock and all other ingredients ready...we have soup!


Pre-Heat your broiler.  
Top the soup with your toasted bread, sprinkle with shredded cheese ( I used mozzarella)
Broil for 2 minutes until cheese is bubbly and delicious!


And SHAZAM!  Amazing French Onion and Mushroom Soup!


Happy Pampered Chef!

Great for our cold South Dakota day!


I feel like this recipe definitely earned me kitchen goddess experience points! 
 ~ Happy Husband Approved ~

Thursday, March 6, 2014

Soup du jour -- Mean and Green for St. Paddy's

This week was cold and snowy....March came in like a LION for sure.  I eat a lot of soup in the cold months, I enjoy a hot meal and soup usually isn't terribly high in calories.

This week I made:

Spinach Tortellini Soup

This is a super easy soup recipe, which again I took my own liberties with :)  For this recipe I used frozen spinach, as it is something we keep on hand.


For this recipe, my husband chose his favorite tortellinis...3 Cheese by Buitoni. 
We have 2 cans of chicken broth - you could substitute veggie stock to make this a vegetarian meal.
A can of reduced sodium Northern beans, garlic and frozen spinach.
1 good pot....I used the RockCrok from Pampered Chef.

I added 1 tablespoon olive oil to my pan with my fresh pressed garlic and let that warm and infuse prior to adding the chicken broth and water.  
The broth was brought to a boil and then I added my tortellini, cooking about 10 minutes. 
 I turned down the heat; added my spinach and drained beans. 
The soup was cooked for about 20 minutes, stirring occasionally.

Spinach has many health benefits and is great for Mean Green St. Paddy's soup du jour!
~The Ginger Princess was not impressed, but my husband was!~


Monday, March 3, 2014

Cucumber Lime Dip - So simple, my 10 year old can make it!

That's right!  My kids love cooking with me, so I employed the power of my eldest to make the next recipe.  This is honestly one of the easiest and most delicious items I have ever made!  Eat it on crackers or use as a veggie dip.  I am eating it on a salad right now :)

 Cucumber Lime Dip


My son has everything ready -notice we do not have an onion....
the boys don't like them, so we are leaving them out.

Start with one package of room temperature cream cheese.  Cut your cucumber in half (both long and short way), so you have 4 parts.  Scoop the seeds out (the seeds hold the water and you don't want runny dip).  

Cut the cucumbers into cubes and place in your manual food processor.  
Give it a few hearty pushes to get that cucumber processed and add to the cream cheese.
Use your garlic press and add a few cloves of garlic to your cream cheese.
Then squeeze in the juice of a lime (as desired for taste).
The Pampered Chef citrus press is amazing, but we don't have that yet...so we did it by hand.


Mix, chill and serve!


Easy and Delicious!
Great to serve at BBQs this summer.

The Ginger Princess was not so impressed, but it gave all 3 of my boys (husband and 2 sons) BIG SMILES!


Tuesday, February 25, 2014

Mexican Fiesta - Taco Ring Supreme

 Hi, I'm CAKES - a self proclaimed kitchen goddess.  My specialty is ....cupcakes, yes that is how I got the name...but I am always challenging myself to try new, healthy and fun recipes for my family and friends.

Recently I was asked to facilitate a Pampered Chef Bridal Shower.  I wasn't sure what to make. I mean, personally I would make sweets and tea sandwiches, but that is my taste.  I started thinking about what the Bride to be's likes are and decided on a Mexican appetizer as one of the items I will make.

This is the recipe I chose:

The Pampered Chef - Taco Ring

You will see in the link that all Pampered Chef tools for the job are conveniently listed, believe it or not they work...but if you don't have it....DON'T WORRY!!  I don't  have it all either :)


The recipe is simple and we love tacos in our home, so of course we prepared for a test run making only a half batch of the recipe listed.    
Lucky for me I had the help of my adorable Ginger Princess.

I prepared our meat, we use ground turkey as a healthier option in our home.  I also used a few fresh cloves of garlic and used my Pampered Chef garlic press to add the garlic to the pan.  Once the meat was fully cooked, I added the taco seasoning (low sodium) and water, once mixed we also added beans.

My daughter helped me create a circular pattern on a cookie sheet with our crescent rolls, as we don't own the round pizza stone.  I scooped 1 heaping Tablespoon of meat/bean mixture onto each crescent roll.


I then wrapped the loose end of crescent roll over the mixture and baked for 10 minutes at 375 degrees.


While the taco ring was baking we moved on to our toppings.  THIS IS THE PART THAT MAKES IT SUPREME!!  I love a nice fresh salsa or guacamole with any taco meal!  For this evening, I used my Pampered Chef manual food processor (my all time favorite item!) and made a tomato/avocado salsa. I chucked 2 medium tomatoes and 1 avocado and placed in the manual food processor.  My daughter helped me with the processing part, because the mechanism is truly that easy to push and creates over 30mph action in the blades......voila!  SALSA :)   To this mixture I added some cilantro and the juice of half a lime.


When our ring was finished baking, 
I placed a nice lettuce leaf in the middle of the ring to create a bowl for our salsa.  

Now if my husband had his way, we would also garnish with shredded cheese.
I chose corn instead :)

This recipe took me 25 minutes tops to prepare and was a hit with the whole family!  
~Ginger Princess Approved~

Don't be afraid to change up recipes to suit the tastes of your family and friends, experiment with your tastes and  taste combinations and just have FUN!